Photographing Landscapes on the Move: A Guide for Mobile Photographers
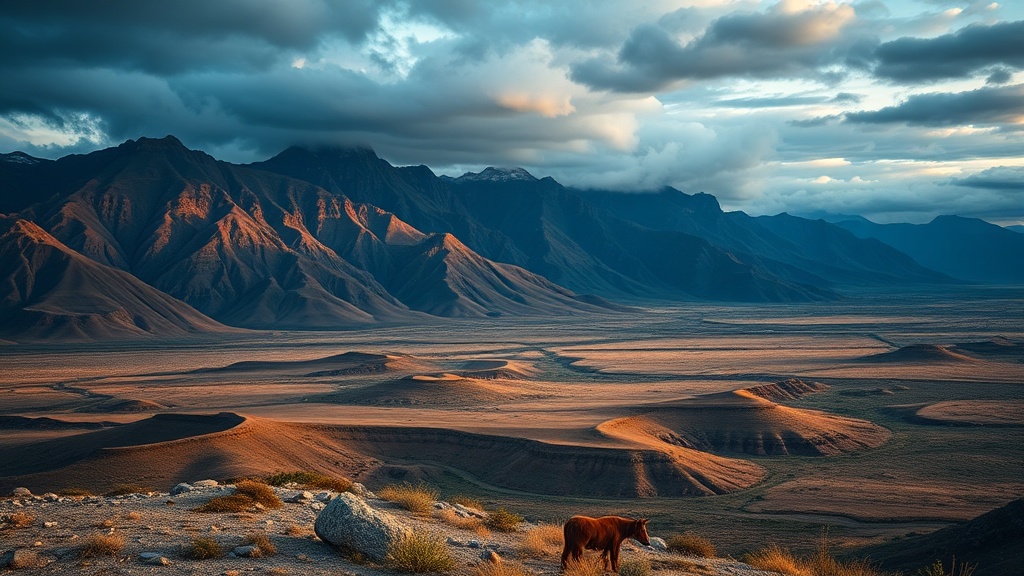
A hiker reaches the summit of a ridge in the Dolomites just as the sun dips below the peaks. They pull out a smartphone, try to capture the scale of the jagged limestone, but the screen shows nothing but a dark silhouette and a washed-out sky. The moment passes. This isn't about having a $5,000 DSLR; it's about knowing how to extract high-quality imagery from the device already in your pocket while you're actually moving through a trek or a trekker's route.
Capturing high-end scenery while traveling requires a shift in how you use your phone's sensor. Most people just point and shoot, but you can get much closer to professional results by understanding light, stability, and software-based adjustments. We're looking at how to maximize your mobile hardware without carrying a heavy camera bag.
How Do You Take Better Landscape Photos on a Phone?
You take better landscape photos by prioritizing light direction and using the "Rule of Thirds" via your camera's grid lines. Most mobile sensors struggle with high dynamic range—that's the difference between a bright sky and a dark foreground—so you have to manage it manually.
First, turn on the grid in your settings. If you're using an iPhone or a Samsung Galaxy, this is usually under the "Camera" menu. Instead of putting the horizon right in the middle, place it on the lower third line. This gives the sky more room to breathe. If you're looking at a dramatic mountain range, the bottom third should be your foreground detail (rocks, flowers, or water) to give the image depth.
Second, stop using digital zoom. If you pinch the screen to zoom in, you're just cropping the pixels and making the photo look grainy. If your phone has a dedicated telephoto lens, use that. If not, walk closer. It's much better to take a wide shot and crop it later in an app like Adobe Photoshop Express than to lose quality by zooming digitally.
The third thing to master is exposure compensation. Tap the brightest part of your screen—like the sun or a bright cloud—and slide your finger down. This lowers the exposure so you don't blow out the highlights. A slightly underexposed photo is easier to fix than one that's too bright.
What Gear Should You Carry for Mobile Photography?
You don't need a heavy tripod, but you do need a few small tools to keep your shots steady and your phone safe. Since we're often moving between locations—perhaps hiking through a pass or jumping off a boat—stability is your biggest enemy.
A small, lightweight tripod like a GorillaPod is a lifesaver when you're solo. It lets you set the phone down for long-exposure shots of waterfalls or moving clouds. If you're hiking, a heavy tripod is just dead weight. I always suggest checking your packing strategies for variable climates to ensure you aren't overpacking gear that won't serve you in the field.
Here is a quick breakdown of the "Mobile Essentials" kit:
- Portable Power Bank: High-resolution screens and GPS drain batteries fast. An Anker power bank is a reliable choice.
- Microfiber Cloth: A dirty lens is the number one reason for "hazy" looking photos. Wipe it every time you pull it out of your pocket.
- Small Tripod: Look for something that can wrap around a backpack strap or a tree branch.
- External Lens (Optional): If you're serious, a clip-on wide-angle lens can help capture more of the scene.
| Tool | Purpose | Weight Factor |
|---|---|---|
| Smartphone | Primary Capture | Negligible |
| GorillaPod | Stability/Long Exposure | Low |
| Power Bank | Battery Life | Medium |
| Microfiber Cloth | Lens Clarity | Very Low |
How Can You Handle Changing Light During a Trek?
Managing light means understanding that the best photos rarely happen at noon. The "Golden Hour"—the hour after sunrise and the hour before sunset—provides soft, directional light that makes landscapes look three-dimensional. If you're mid-trek, this is when you should be most alert.
When you're moving through shadows, such as a deep valley or a forest, your phone will try to compensate by brightening the whole image. This often results in a "flat" look. To avoid this, look for "rim lighting." This is when the light hits the edge of a mountain or a tree, creating a bright outline against a darker background. It adds a sense of scale that a flat, midday shot just can't match.
If you find yourself in a high-contrast situation—like a bright snowy peak against a dark sky—use HDR (High Dynamic Range) mode. Most modern phones do this automatically, but you can often force it. It takes three or more shots at different exposures and blends them together. It's a great way to keep the details in both the bright snow and the dark rocks.
Wait for the light to change. Sometimes, a passing cloud is your best friend. A cloud can block the harsh sun and create a dramatic, moody atmosphere. If the light is too harsh, wait ten minutes. The landscape will look entirely different once the shadows shift.
How Do You Edit Photos Without Looking "Fake"?
Editing is about enhancing what is already there, not adding things that weren't in the original scene. A common mistake is cranking up the saturation until the grass looks neon. That's a dead giveaway that you've over-processed the image.
Start with the "Levels" or "Curves" tool. Instead of just turning up the "Saturation" slider, try increasing the "Contrast" and "Black Point." This makes the shadows deeper and the light pop without making the colors look artificial. If you're looking at a landscape with a lot of blue sky, a slight increase in "Vibrance" is usually better than "Saturation" because it's more subtle.
The goal is to make the viewer feel what you felt when you were standing there. If the air felt crisp and cold, maybe lean into the cooler tones (the blue end of the spectrum). If it was a warm afternoon in Southeast Asia, lean into the warmer tones. This is a great way to maintain the mood of your trip. For more on planning the actual logistics of these trips, check out my guide on planning your first multi-day trekking expedition.
One final tip: always keep your original, unedited photo. If you go too far with an edit, you can always go back to the original file. This is why shooting in "RAW" format is a huge advantage if your phone supports it. A RAW file contains much more data than a standard JPEG, giving you more room to play with shadows and highlights during the editing process.
The best gear is the gear you actually have with you. Don't worry about the lack of a professional camera. Focus on the light, the composition, and the moment. The goal isn't just to take a photo; it's to document the scale of the world you're exploring.
Steps
- 1
Stabilize Your Device
- 2
Find the Golden Hour
- 3
Use the Rule of Thirds
- 4
Clean Your Lens Regularly